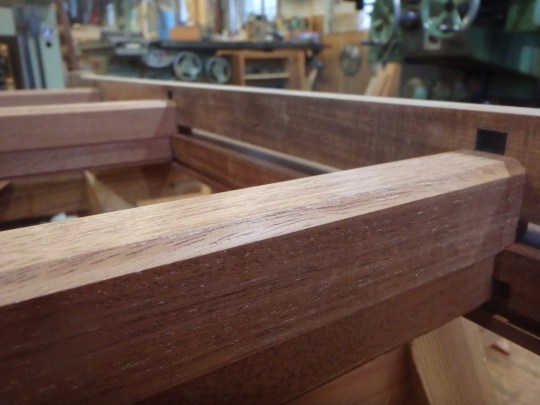
The project gradually moves forward. Finally the parts comprising the sides of the cabinet are ready for a trial assembly now that the glue on the double dovetail sliding keys has had 24 hours to set:
The front post attachment:
I got the parts together then started tapping them along their dovetails, until the fit started to feel on the tight side. So I’d strip the posts off again, then adjust the joints, then reassemble and try again, getting a little further each time. Creeping up on the right degree of fit, which is somewhere less than ‘screaming tight’.
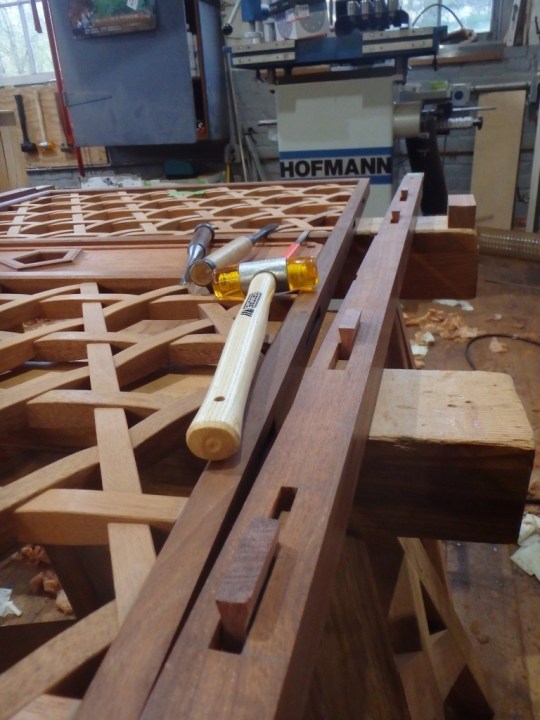
Here we are after the second round:
On this side the parts are getting close:
But on this side the post has a fair way to go yet:
Upon disassembly, rub marks on the cheeks of the keys indicated where a spot of light stock removal was in order:
Once I had the two posts in place I checked the abutment relationships top and bottom to see if they were on the money. In this case, the latticed frame was about 2 hundredths (0.5mm) longer then the post’s tenon shoulders, so I had to trim a surface accordingly.
Then I could look at the fit of the lower frame member, which slides in on the two post tenons:
Again, the fit was tight, so I adjusted until I got a smooth fit, again inferring from rub marks on the mating surfaces.
At this juncture, the post tenon is within 1/8″ (3mm) of the lower frame’s bottom surface
I am very careful in how I separate the parts given the rather slim dimensions for the tenon. I set up a pair of blocks against which the lower frame’s corner joint halves can bear, and then carefully drift the post tenons out, a little at a time each side:
A while later I had the post tenons getting further through:
Once I could see that the lower frame piece was also going to engage okay with the two floating tenons glued to the lower rail of the latticed frame, I set it aside and took a look at the upper frame connection:
Had a half day in the shop today, as usual on Fridays, as we have our son in daycare for the morning.
A rainy half day provided enough time to attend to a few more items on the build plan (not there is a written plan or anything like that). The battens from yesterday, now stripped of clamps, are in place, and I’m checking the fit of the sills on each side to the dovetail tenons on the ends of the battens:
It was the case on each side that 2 of the three sliding dovetail connections had a ‘just right’ fit, while one was a hair tight:
Getting the parts to come together in a trial fit required only some minor chisel tuning to one dovetail mortise, after which the sill slid on what seemed like an appropriate degree of friction:
That’s as far as I took it with those fits. I could see the parts were going to go together, and no point wearing on the connection surfaces any further. Let’s keep the sliding dovetails fit nice and tight if at all possible, and for as long as possible.
It then seemed like time to deal with the part which rests atop the battens, on their sliding dovetails, and fits within the lower frame via tongue and groove:the floor panel. This is a part I prepared close to finished many months ago power planing it to a bit over dimension and then forming the tongue along the edges. Nicely, it remains flat after stints in both the near-vertical position and the horizontal, sandwiched between batten stock and other material.
I measured it and, at 0.5080″, it was 0.008″ over the desired dimension. That extra thickness reflects my estimation at the milling stage of how much room to allow for efficient clean up of the surface to remove any defects from the power planing stage. If you leave too little, then bringing it down to size may not remove all surface defects, and if you leave too much, you are having to take too many passes to clean it up.
In order to get a panel to the required thickness, and with a very flat surface, free of defects, one needs a tool capable of precise stock removal. I happen to have such a device.
It was time, in other words, to finish plane the top with one of my kanna, at the start knowing I had a certain amount of material to work with, as noted, plus there was a defect/damage in the board surface to deal with on top of that. My hope was that I could get rid of the defect without taking the surface below the 0.500″ line. I started planing:
The defect I mentioned is a semi-circular ding right at the near-side of the board, and in fact sits roughly below where the plane is parked in this photo:
Where did that dent come from? I don’t recollect that there was a dent there before, but it was what it was and the defect had to go. I steamed the dent first, which seemed to reduce its depth somewhat. Once I had skimmed off the surface by 0.008″ , via about 10 plane strokes or so I guess on each square inch, and got the board to target dimension, the ding was most fortunately all removed. I managed to plane the VG mahogany without having any tear out too, so it was a clean surface. Nice when you get what you are looking for…
After having made a clean and flat surface, I go over it with my Rotex sander fitted with extra-fine #400 paper, which leaves a slightly smoother surface to the touch. Then I blow the dust out of the pores with my air compressor. Now is the time one might apply a grain filler, as mahogany has surface pores, if one were applying a film-forming or oil/wax based finish afterwards. I’m not that bothered by the pores mind you.
I just apply wax:
At this point, the wax has been applied generously, and I’ll let it sit a few weeks hardening before we get to finish steps with it, involving a session with #0000 steel wool.
Wax is about all I can apply on the interior of a cabinet which is for storing futon or other fabric-based materials. The other option would be to leave the wood bare, and I have considered that route. I settled on wax alone as a happy medium. Wax doesn’t offer significant protection to the wood of course, and needs to be periodically renewed, based on wear. On the plus side, wax keeps a surface a bit more resistant to household dust than a bare one I would think, and most importantly, gives the board a slight deepening of color, bringing out the grain more.
I’m not going to apply any oil or oil/wax finish to the cabinet interior. Oil-based finishes can become stinky over time in enclosed spaces from what I understand. Not what you want to smell when you swing open the front doors or pull out a drawer. Maybe with the latticed sides it would not be so much of a factor, but I’m not taking any chances in that direction.
After the panel was set aside, I started in on some of that double dovetail key fitting:
These keys have been fitted to the four post mortises, but not to the latticed frame and panel assembly. Next time.
A longish post today, and lots of photos. Consider yourself forewarned. Abandon hope all ye who….
All right, it seemed like a good time to take a break from the sliding dovetail key fitting on those latticed frame and panel assemblies and finish off the joinery on the shedua drawer fronts:
The fronts are connected to the sides via 4 tenons, the low stressed pair in the middle and blind, and the higher-stressed pair on the outside, top and bottom, and through.
There are some improvements to the joinery arrangement on these drawers as compared to previous. Besides the drawer sides now being one piece, the lower connecting mortises are aligned to the dado for the floor panel, which streamlines cutout somewhat:
At this stage, the drawer fronts are about 1/2″ (12.7mm) too long each end, so that leaves the look of the joinery a little misleading at this point.
After the mortises are milled, they get cleaned up and squared up by chisel:
A look at the drawer face and the two through mortises on this end:
The flare for the wedge has yet to be pared out, as inspection of the layout lines reveals.
These two fronts can be set aside now until I have tackled the tenon work on the drawer sides:
As I have been working on the latticed frame and panel sides, I am approaching the point where I will be fitting the posts to these members, and that aspect relates to the spacing of the associated mortises for those tenons on the top and bottom frame assemblies. In order to button those assemblies up a little further, it seemed like it was time at long last to tackle the mortises for the half dovetails which hold the panel supporting battens to the frames. I know reader JT has been interested to see this, at the very least.
These mortises require tilting the hollow chisel to two different angles, along with two different ‘y’ positions, as the Powermatic only tilts one direction:
Down where the chips fly:
Half the battle with these is keeping really clear as to which sloping mortise wall side is on which mortise end wall.
After a run was completed, some attendant chisel work was taken care of:
A guy wrote to tell me recently, and without so much as a how do you do?, told me that I had fallen prey to a marketing campaign started somehow by the Ashi Shinbun (newspaper) after an article they had at some point on Watanabe Kyoei, the maker known as Kiyohisa. Am I familiar with this article? No. As it turns out these are terrible chisels and I am deluded somehow in liking them, (which I admit I stubbornly persist in doing). Everything Kiyohisa makes sucks apparently, and it is a major international scandal. I’ll struggle on somehow, though how I’ll stand with shoulders tall again is beyond me. I guess I could make more use of the other chisels by other makers in my set.
Someone let me know when a maker comes out with a chisel that is easy to sharpen, holds an edge forever, and never chips regardless of what you slam it into. That’s the one that we all dream about.
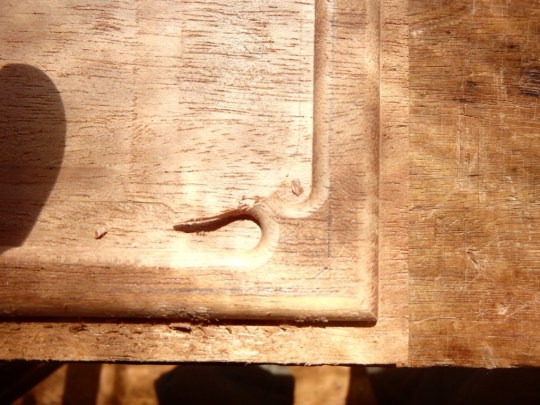
Back to the account. I took a look at a trial fitting of the batten half dovetail:
In case it is not clear from the above picture, the half dovetail portion, sloped close to 7˚, is on the right side. It looks hardly sloped in this view, but believe me the slope is quite sufficient.
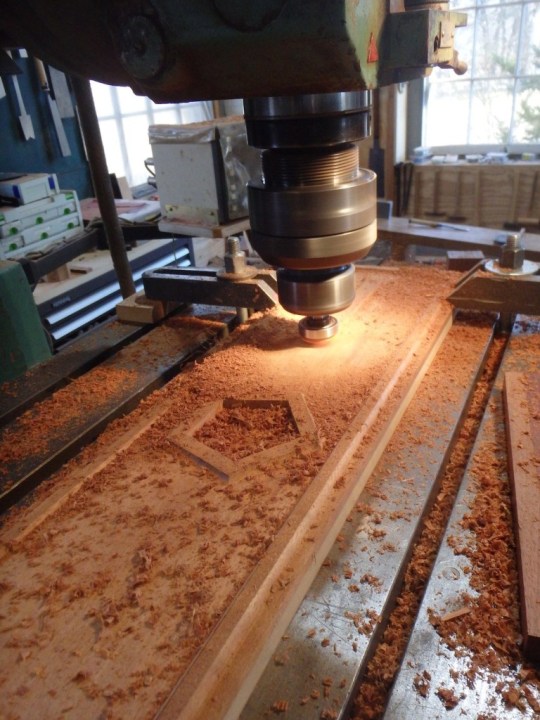
I’d like to start by mentioning that when I went into the shop, one of the next steps to tackle was the cutting of the latticed frame and panel unit’s corners for glue-in splines. When considering how to go about this task, several options presented themselves, but most were ruled out. For instance, if I had a blade for my tablesaw which left a flat-bottomed kerf, it would not be hard to put some sort of jig to stand the frame and panel unit on its corners together. No such blade is in my meagre set however, so on to the next option. My router table did not offer a comfortable margin of support for the piece as it was moved through the cut, but of course something could be set up. The Hofmann mortiser has a cutting direction which I think would be preferably avoided and slot cutters used instead to make the cuts as they tend to produce cleaner cuts in this situation.
I have the pattern-maker milling machine, which had been employed previously for this kind of joinery task. One might think if the machine worked the last time, why not automatically employ the same method again? Well, I sometimes like to reconsider my options afresh, to see if there might be a better way to handle a particular operation.
There were numerous advantages to using the milling machine, namely secure work-holding and precise control over most axes of movement, but one disadvantage apparent from the start was that I would have to take the head and ram on the machine and move the works out of alignment with its current alignment to the center of the rotary table, which is also a place where 0.000″ is set on the DRO for X and Y axes.
Here, I’m just eyeballing the situation to se if the milling machine is the way to go again or not, placing the frame and panel assembly on the table and turning it 45˚:
With the table turned at a 45˚ you need to watch that it doesn’t run into the column at some point in the cutting movement, a problem that I failed to anticipate last time. To give ample room, I have swiveled the ram over several degrees to the right.
At the same time my I was looking at the situation with the milling machine, I was also strongly considering using the shaper for this job:
Now, yeah, i get it that I might have more options , equipment-wise than a lot of folks out there, less than some others, and in no way am i intending to rub anyone’s face in that. I’m just looking at the options I have at this juncture. The sliding table on the shaper can be swiveled 45˚ or so to both sides and it offers higher rpm than the milling machine by about double.
Again, if I had certain tooling on hand for the shaper, the decision might have been easy to go with it. A nice pair of 0.1875″ slotting blades mounted on the arbor – makes perfect sense. I was faced also with the prospect however of un-docking the fence assembly, then fitting the router spindle into the machine. Then see if the sliding table would come over far enough towards the spindle as to provide good cut support given the use of a smallish cutter
The shaper was looking like a good way to do it for a while, however, the part support and fixturing capacity of the mill’s work table as compared to the Martin’s was clearly a notch above, and ya gotta go with what tooling you have, with an ever growing lists of ‘wants’ as well being generated.
I decided to go with the milling machine again, trying to bring forward lessons from the first time doing such a task on the mill. Here I have aligned the part to the work table and clamped it in place, and set the cutting depth by eye:
The work table has been fitted with a backing element which also serves to eliminate any spelching which could occur as the cutter exits the material.
A closer look as I have reached a point where I am ready to start cutting:
The various slot cutters I have are by Whiteside and Amana, and range in size from 1/16″ to 0.25″ (6.35mm). I’m often preferring to use the Amana bits these days because they have a bit larger diameter than the Whiteside. And extra cutting wing on the Amana cutters doesn’t seem to hurt their operation either.
The first slot is cut, requiring a 2-step approach as I’m making a 0.125″ slotting bit do the work of the cutter I don’t (yet) own, namely the 0.1875″ slotter.
So, no big deal:take a pass, then reset the depth, take a pass. Repeat back and forth:
With the one position set up, I cut once on each of the four corners, doing therefore half of the slotting. Then I need to reverse the position of the rotary table and reconfigure a few other things for the remaining cuts:
The ram is now swung the other way so I can work off the table corner like that.
Eventually all of the round #2 cuts were done and I had a double-slotted corner joint:
The close-by location of the sliding dovetail mortise on the upper frame rail kept the slot depth on those upper corners a bit shallower than the ones on the bottom corners. They weren’t hugely different depths from one another however.
Eventually the work was completed on all the corners of the latticed frame and panel assemblies:
Another view, this time of the bottom corner with it’s deeper trenches:
I’ve been working on these latticed frame and panel assemblies, which comprise the two narrow sides of the cabinet, for what seems like forever now. Still not done, but getting closer to the line…. Today I’ll share a few more steps.
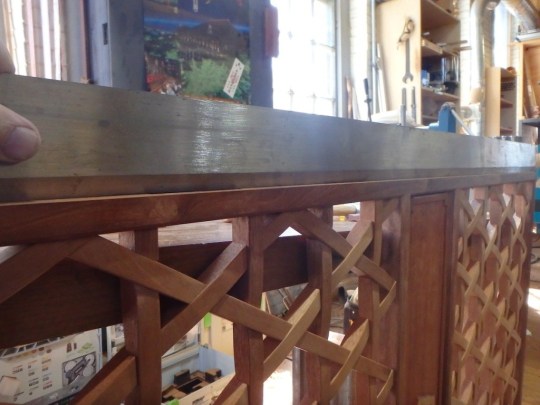
With glue-ups complete, and the miters cleaned off, the next step I chose to do was to joint the edges of the frames with a plane to get them as straight as I could:
Working to have a 48″ Starrett straight edge sit on there so as to have no light gaps anywhere:
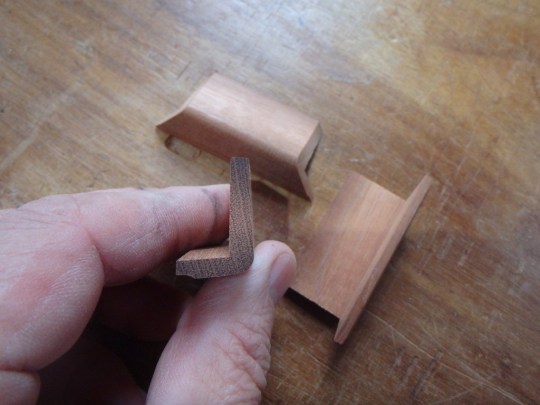
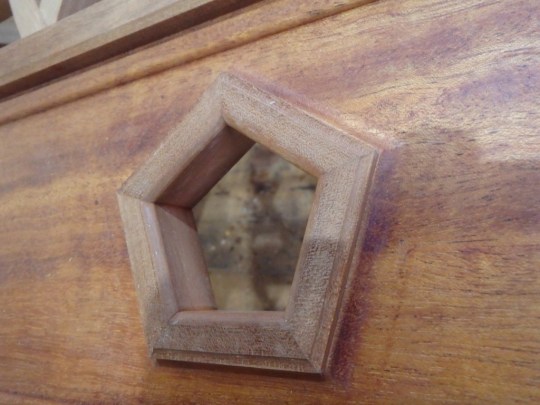
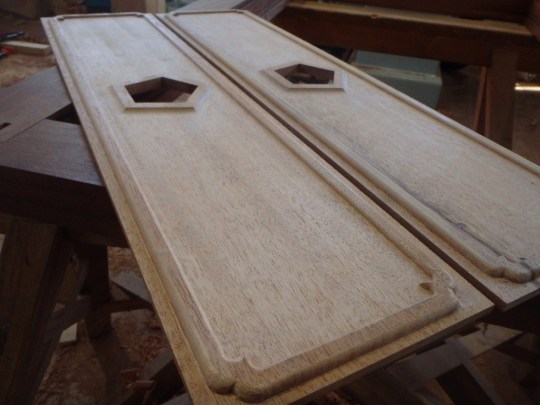
Next up was to fabricate the liners for the pentagonal opening in the middle panels. The cross section of these pieces looks like this:
A little difficult to tell from the above photo perhaps, but the inner corner of the ‘L’ is square, while the outside, which is the viewed surface, has a taper which opens the hole up from front to rear.
Here’s one done:
Compared to the mock-up done earlier, these lines have a profiled outer edge, a rounded transition from front to inside faces, and considerably greater depth.
Another view:
I applied glue to the interface seen above, as well as the mitered abutments between pieces, but none on the contact surfaces around the pentagonal hole in the panel.
One more:
The two panels were then completed to the same point:
Another view- here you can see the beginnings of the next step in the process, which is the making of close-fitting floating tenons for the bottom surface of the frames:
The mortises to which the aforesaid floating tenons connect are in the lower frame. Switching gears a bit, I decided it was time to complete the profiling of the outer face of the lower frame, a task which is conveniently done on the shaper.
The corner joints have portions of end grain exposed, and thus one has to approach these sort of task differently then if the corners had miters meeting at the front faces. I decided to employ the overlapping through-mortises in these corner connection so as to form a temporarily connected unit. For this, I made opposed wedge sets:
A closer look:
The wedge pairs were tightened up, and then trimmed off with a flush cut saw, kugi hiki nokogiri as the Japanese call them.
I clamped a sacrificial block on the single corner in each of the two long runs to protect the one spot vulnerable to tear out, then ran the piece through on a climb cut:
It has become apparent of late that I needed an oil gun for the ways on a couple of machines, more notably the milling machine and the Wadkin tablesaw. The milling machine has it’s own manual lube pump, however there are spots here and there where I could usefully apply oil, and sticking my finger into the end of an oil canister to obtain a smear was proving less entertaining as time wore on. The Wadkin saw is supposed to have oil on both of its trunnion quadrants (the parts supporting the tilt of the trunnion and blade), as well as the ways within the trunnion giving up/down control of the blade. Both of these spots, according to the manual, are supposed to be accessible once one has slid the sliding table forward, however in reality they are not, and incredibly, in order to lubricate the raise/lower sliding points one would actually have to remove the main table of the machine.
That is sufficiently crazy in design terms to win some sort of award. My plan is to add a hand pump oiler to the machine and plumb in hydraulic lines to at least the raise/lower ways. In the meantime, a hand pump oiler seemed worthwhile to obtain.
Now sure, I could have headed down to my local Harbor Freight, where most everything in the store comes from China, or looked on Amazon to find out what scintillating product they might recommend, also most likely to be made in China. And for something used on the more infrequent side, either of those avenues would likely have gotten me something hopefully halfway functional, if only for as long as the warranty lasted. We all know the scene.
Instead, I looked around a bit more and found a much higher quality product from Switzerland, made by Reilang:
This arrived in the past couple of days. The packaging was not the best, and the tip of the oiler was starting to poke through the cardboard box, but all was intact otherwise. Possibly they are not used to shipping their stuff overseas.
Now, an oiler is in most respects a rather mundane seeming sort of thing, but this item is a total gem. It oozes quality as soon as you see and handle it.
Another view:
The aluminum tank is thick-walled, and all the parts are cleanly finished and faultless as far as I can tell.
Internals comprise a brass tube with a swiveling pickup:
The swiveling pickup is a smart idea, as it means the end of the pickup is always going to be sitting at the bottom regardless of how the pump is oriented in your hand.
I filled it up with Mobil Vactra #2 way oil, and pumped the finger lever until it delivered oil out the tip, which, unsurprisingly, came in nice discrete bursts. Nothing leaked. I almost wanted to take it home and place it on the mantle, not that most observers of it would have any clue why I might feel that way.
Sure, I paid likely 10x more for this than a Chinese or Indian made item, and I have not the slightest regret about that expenditure. It feels good to have acquired a tool one knows right away is going to be a lifetime ownership piece. Based on this, I would highly recommend anything Reilang makes.
This time up, I’m milling up the sides for the drawers, made of rift~quarter sawn H. Mahogany:
I had roughed out the underside, as you can see, to produce a large dado, using the table saw (wish I had a dado head!).
These are the four drawer sides after rough milling has been completed:
There is a change also to the design of the sides, now one piece units with an i-beam form, instead of the two-piece approaches seen earlier. More on this in a later post. You can see by the 1/4″ (6mm) dado in the above photo where the floor panel will run. The cross section of these sides is at an intermediate stage at this point.
While that was going on, I moved the latticed side panels along by doing sub-assembly glue-ups. Here’s the very first side panel sub-assembly glue-up:
While that unit was sitting in clamps, I got to work on preparing the stock for the drawer fronts. I opted to make these two pieces from a pair of quartersawn boards of curly shedua I had left over from the previous cabinet project. A pass through the jointer and planer, both fitted just recently with new knives, reminded me immediately of the challenge of working this material: it tears out so easily, regardless of how sharp the knives are or whether one takes a deep cut or a shallow one. You can’t get to much closer than 1.5 mm from a face with conventional planing before you risk a bit of tear out going too deep into the material.
Again, the pattern mill was the answer to this problem, as it allows me to process the drawer front to a very flat and dimensionally accurate block, with no tear out problems (so long as one chooses cutters carefully, a insert-knife single fly cutter in this case):
Here are the two dimensioned drawer front blanks side by side as they will be positioned in the cabinet:
A while later I had the surfaces planed clean and the mortises for the drawer side’s multiple tenons roughed out:
And the fronts have been milled in a manner similar to the sides, and with much the same front profile as the drawers for the previous cabinet I made for the client:
In this drawer, which I am calling the ‘Mark III’ version, two of the four tenons will be carried through from the sides.
Curly shedua is a beautiful material but not easy to work with as far as I am concerned. Getting the fronts to this stage reminded me that I will have to order some hardware from Japan in the near future, for the drawer and door pulls.
My main goal the past week though has been to get the latticed panels into glue up. This was looking like it might have to be put off for a few days, due to some indecision about finishing the pieces that surround the panels. The German oil/wax no VOC finish I chose to use, which is an ‘apply one coat’ sort of affair, made the mahogany panels darker than I was expecting. I eventually decided I did not want to apply the same finish to the cuban mahogany frame pieces as they are already quite dark enough. So, I have decided that the frame members are only going to be planed and receive a coat of wax. Wax offers only limited protection for the wood, but the piece is in a situation where it will not receive high wear and tear so I think this seems the best direction.
After waxing the frame pieces surrounding the panel, I got to the glue up at long last:
One of the benefits to a table saw with 72″ (1.83m) of rip capacity on the table.
Another view:
Here’s how the first side looked after it came out of the nest of clamps:
I had in my mind that the smallish side panels which sit in the middle of the latticed cabinet sides were not too much of a time sink, however I was quite wrong about that. These panels have a raised field which is then slightly sunken inside the boundary, and have a pentagonal opening in the middle. Machining the pentagonal opening, once the milling machine’s spindle was centered on the rotary table, was relatively straightforward. Probably the most precise pentagons I have cut, come to think of at, all due to the tool at my disposal.
The drawing of the cabinet, being in Sketchup, meant leaving off certain details which involve curved beading and so forth, as that is best left aside when using Sketchup. I had been mulling over various ways I could detail this component, and before starting the work on the actual panels, I prepared a mock-up:
The opening is raised around the pentagon and there is an added cuban Mahogany liner. I am still somewhat uncertain as to whether to go with that combination, which would be consistent with much of the rest of the cabinet, or to use a different wood. Some candidates which come to mind:
shedua (which would match the drawer fronts in this cabinet)
bubinga (tying this cabinet in a minor aspect to the one made previous for the client)
holly (making the opening as bright as possible)
gabon ebony (making for a strongly contrasted liner)
We’ll see how that plays out, however the leading candidates as of today are the Shedua and the Cuban Mahogany.
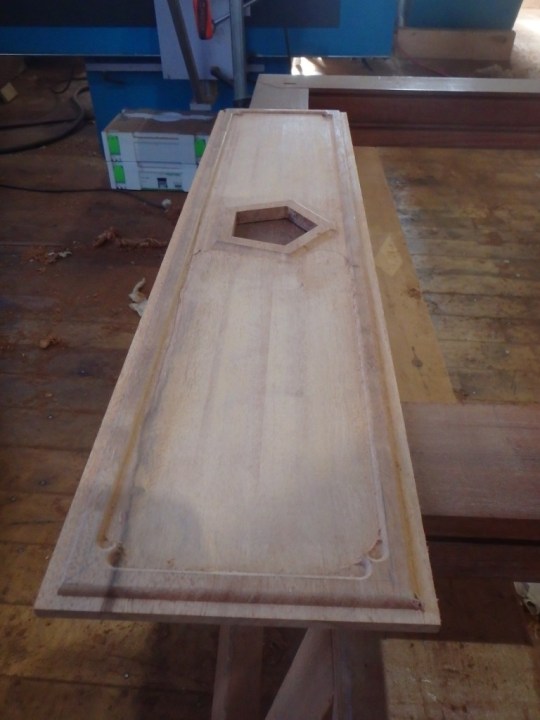
Here I’m mid-way along hogging most of the material out to leave the raised (and sunken) field:
It is raised up 3/16″ (4.75m) from the panel tongue and sunk down 1/8″ (3.2mm) from the beaded edge treatment.
Here’s how the first quartersawn Honduran Mahogany panel looked after roughing out was complete:
The remaining work on the re-entrant corners and a portion of the raised pentagon will be a task for a few chisels and a good chunk of time:
After a while the corner starts to take shape:
As the train pulled into the station, late afternoon, the two panels were at the 90% mark, needing another going over when my mind is fresh (not today):
Another view:
The liner is next, and again, not happening today. I got some work done on the drawer sides however (more on that in a future post).
The side panels need to be taken right through to completion, with the liners glued in the pentagonal openings, and the finish applied, before they can be placed into the latticed side frames for glue up. One of those ‘hurry up and wait’ sort of deals. Hoping to complete these parts within a couple more days and get the side frames glued up.
All for this round- thanks for visiting this blog, and if you have any thoughts or questions to share, please feel free – otherwise enjoy your day!
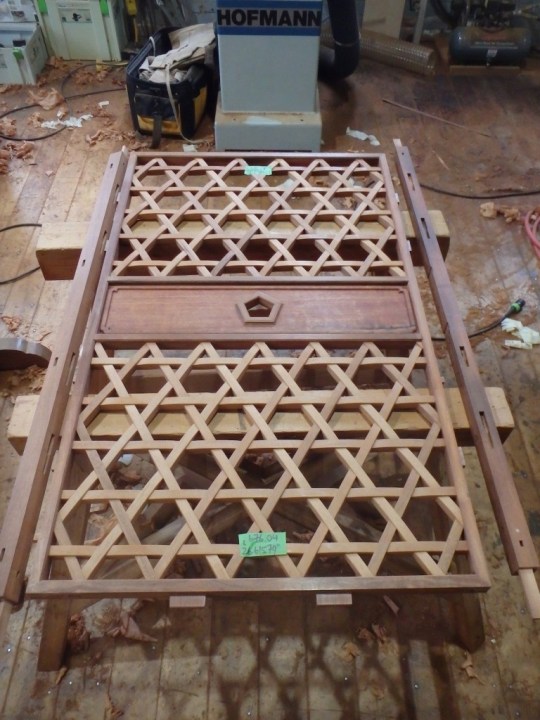
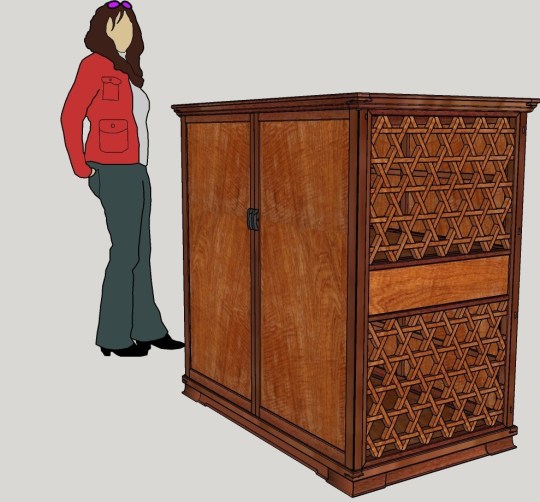
The sides of this cabinet are designed to allow loads of crosswise airflow, and yet serve as an important structural member, having stiffness against shear:
The latticed hexagonal frame work with its (apparently) fully woven construction connects to the surrounding framework using floating tenons. These connections will all be glued.
The work on building the lattices themselves was one of the first aspects of this project to be tackled. So they were sitting waiting in a stack, and I’ve been steadily working my way back to them for the past while.
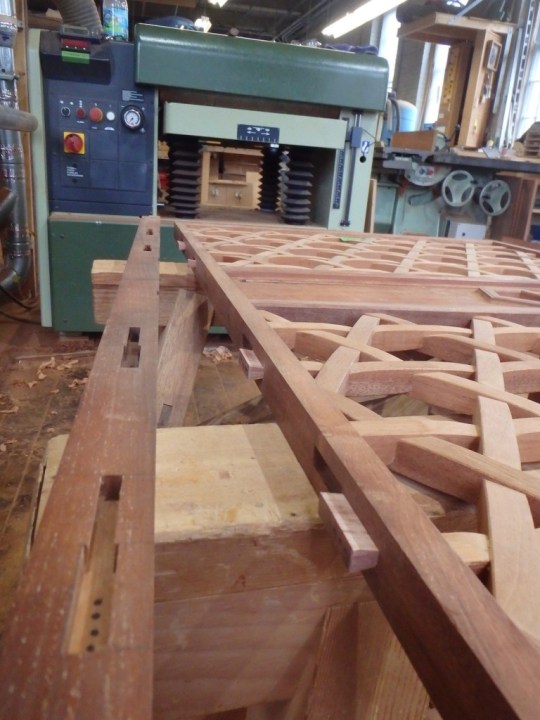
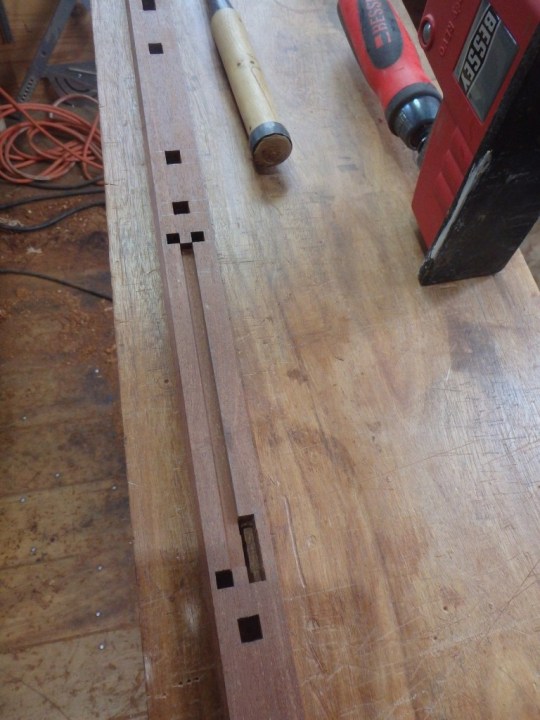
The last blog entry featured the sliding dovetail mortises on many parts, including the stiles for the latticed panels. One the front sides of those same parts a whole pile of mortises have been placed:
A closer look at the section having the mortises and dado for the middle rails and the panel sandwiched between them:
It was a lot of mortising, and very enjoyable. The main excavation work was done on the hollow chisel mortiser, and required additional clean out in the bottom of the blind mortises, so it was a two-step sorta thing.
Here’s an initial fit of of one of the latticed panels to a pair of rails:
I had made the latticed panels as square as I could, and they will in fact be the items that determine whether this frame and panel assembly is to be square-cornered overall or not.
At this point in the proceedings, the miters have not been cut at the frame corners, and the parts can not come any closer to one another. That miter work needs to be done before the many tenon locations can be marked directly onto the stiles.
Here is how much closer the parts get after the miters are trimmed back:
After the mortises are marked out, they are cut on the hollow chisel mortiser, and then cleaned out with a 6mm chisel.
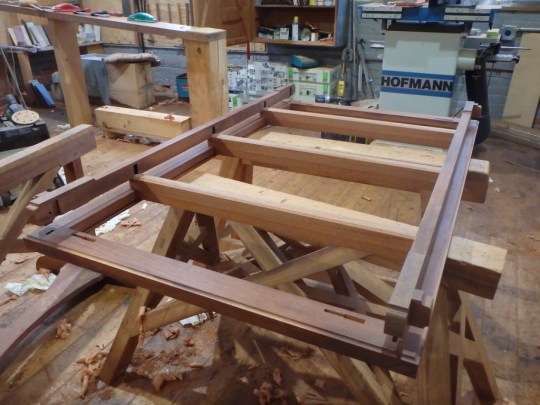
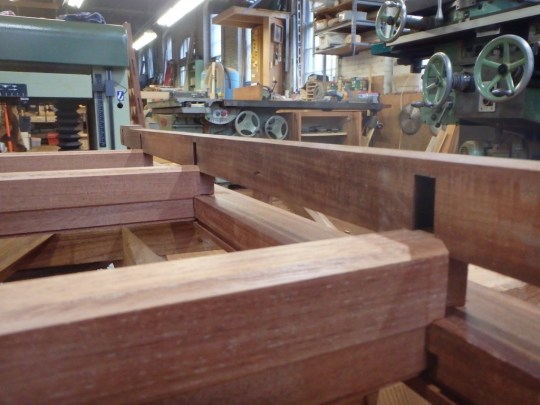
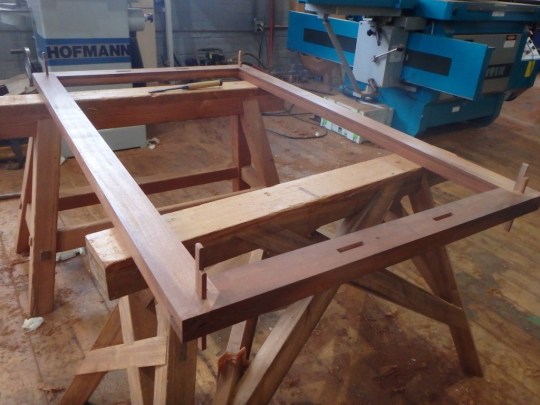
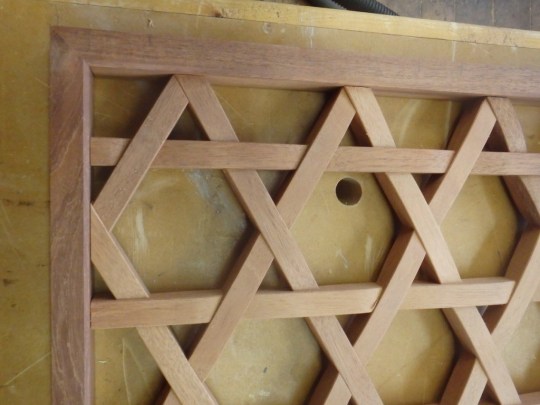
In the next picture I have completed the mortising work on all the frame members for one side of the cabinet. After dry assembly, no clamps, one can see the ballpark we are playing in:
A second corner now:
Then the 3rd corner:
The first panel together, I wanted to take a look at it in the orientation it has within the cabinet, so I sat it on a sawhorse: